分类 Develop 下的文章

Fragment碎片是可嵌入到活动中的UI片段,能让程序更加合理利用大屏幕。

Fragment基本用法

在一个活动中添加2个Fragment,这两个Fragment平方活动空间。
1、创建左侧的Fragment布局left_fragment.xml

<?xml version="1.0" encoding="utf-8"?>
<LinearLayout xmlns:android="http://schemas.android.com/apk/res/android"
    android:orientation="vertical"
    android:layout_width="match_parent"
    android:layout_height="match_parent">

    <Button
        android:id="@+id/button"
        android:layout_width="wrap_content"
        android:layout_height="wrap_content"
        android:layout_gravity="center_horizontal"
        android:text="Button"/>
</LinearLayout>

创建右侧的Fragment布局right_fragment.xml

<?xml version="1.0" encoding="utf-8"?>
<LinearLayout xmlns:android="http://schemas.android.com/apk/res/android"
    android:orientation="vertical"
    android:background="#00ff00"
    android:layout_width="match_parent"
    android:layout_height="match_parent">

    <TextView
        android:layout_width="wrap_content"
        android:layout_height="wrap_content"
        android:layout_gravity="center_horizontal"
        android:textSize="20sp"
        android:text="This is right fragment."/>
</LinearLayout>

2、创建Fragment类
左侧Fragment类LeftFragment:

public class LeftFragment extends Fragment {
    @Override
    public View onCreateView(LayoutInflater inflater, ViewGroup container, Bundle savedInstanceState) {
        View view = inflater.inflate(R.layout.left_fragment, container, false);
        return view;
    }
}

右侧Fragment类RightFragment:

public class RightFragment extends Fragment {
    @Override
    public View onCreateView(LayoutInflater inflater, ViewGroup container, Bundle savedInstanceState) {
        View view = inflater.inflate(R.layout.right_fragment, container, false);
        return view;
    }
}

3、在活动布局中添加Fragment

<?xml version="1.0" encoding="utf-8"?>
<LinearLayout xmlns:android="http://schemas.android.com/apk/res/android"
    android:orientation="horizontal"
    android:layout_width="match_parent"
    android:layout_height="match_parent">

    <fragment
        android:id="@+id/left_fragment"
        android:name="com.jyoryo.app.android.study.LeftFragment"
        android:layout_width="0dp"
        android:layout_height="match_parent"
        android:layout_weight="1"/>

    <fragment
        android:id="@+id/right_fragment"
        android:name="com.jyoryo.app.android.study.RightFragment"
        android:layout_width="0dp"
        android:layout_height="match_parent"
        android:layout_weight="1"/>
</LinearLayout>

- 阅读剩余部分 -

通过Android Studio可视化编辑器可以通过拖拽方式完成界面布局,但这种方式生成的界面通常不具有很好的屏幕适配性,而且编写较为复杂界面时,通过可视化编辑器实现效果也不好。建议新手还是通过xml方式编写界面。通过Android Studio强大的智能提示,使用xml方式编写界面也是很方便的。

Android常用控件

TextView

TextView应该是最常用的一个控件,用来显示一段文本内容。简单的TextView用法如下:

    <TextView
        android:id="@+id/text_view_1"
        android:layout_width="match_parent"
        android:layout_height="wrap_content"
        android:text="This is a TextView1!" />

    <TextView
        android:id="@+id/text_view_2"
        android:layout_width="match_parent"
        android:layout_height="wrap_content"
        android:gravity="center"
        android:text="This is a TextView2!" />

    <TextView
        android:id="@+id/text_view_3"
        android:layout_width="match_parent"
        android:layout_height="wrap_content"
        android:gravity="center"
        android:textSize="24sp"
        android:textColor="#00ff00"
        android:text="This is a TextView3!" />
  • android:id:给控件定义一个唯一标识符;
  • android:layout_widthandroid:layout_height:定义控件宽度和高度,可选择有wrap_contentmatch_parent,和fill_parent,一般用wrap_contentmatch_parent
  • android:text:定义控件显示的文本内容;
  • android:gravity:指定控件文字的对齐方式,可选择有topbottomleftrightcentercenter_horizontalcenter_vertical等,可以用管道符"|"来同时指定多个值;
  • android:textSize:定义文字的大小;
  • android:textColor:定义文字颜色。

- 阅读剩余部分 -

Android四大组件:Activity(活动)Service(服务)Broadcast Receiver(广播接收器)Content Provider(内容提供器)

  • Activity(活动)
    Activity活动是所有Android应用的界面显示,凡是应用中能看到的内容,都是放在活动中。
  • Service(服务)
    Service服务无法看到,但是它会一直在后台默默地运行。
  • Broadcast Receiver(广播接收器)
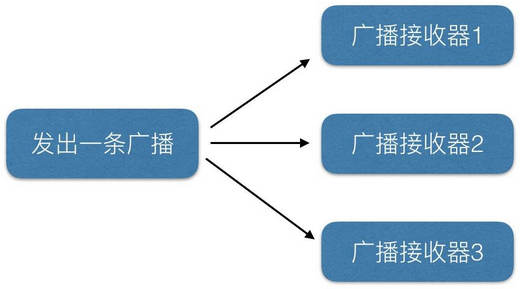
    Broadcast Receiver广播接收器运行应用接收来自各处的广播消息,比如:电话、短信等。我们应用也可以自己定义广播消息对外广播发送。
  • Content Provider(内容提供器)
    Content Provider内容提供器为应用之间共享数据提供了可能。比如访问系统电话簿中的联系人,就需要通过内容提供器来实现。

本文是对Activity(活动)的总结。

活动的创建

  1. 创建活动Activity的类。例如:

    public class MainActivity extends AppCompatActivity {
       private static final String TAG = "MainActivity";
       
       @Override
       protected void onCreate(Bundle savedInstanceState) {
           super.onCreate(savedInstanceState);
           setContentView(R.layout.activity_main);
       }
    }
  2. 创建活动的布局(视图)

    <?xml version="1.0" encoding="utf-8"?>
    <LinearLayout xmlns:android="http://schemas.android.com/apk/res/android"
       android:orientation="vertical"
       android:layout_width="match_parent"
       android:layout_height="match_parent">
    
       <TextView
           android:layout_width="match_parent"
           android:layout_height="wrap_content"
           android:text="This is a activity!" />
    </LinearLayout>
  3. AndroidManifest.xml中进行注册。

    <?xml version="1.0" encoding="utf-8"?>
    <manifest xmlns:android="http://schemas.android.com/apk/res/android"
       package="com.jyoryo.app.android.study">
    
       <application
           android:allowBackup="true"
           android:icon="@mipmap/ic_launcher"
           android:label="@string/app_name"
           android:roundIcon="@mipmap/ic_launcher_round"
           android:supportsRtl="true"
           android:theme="@style/AppTheme">
           <activity android:name=".MainActivity">
               <intent-filter>
                   <action android:name="android.intent.action.MAIN" />
                   <category android:name="android.intent.category.LAUNCHER" />
               </intent-filter>
           </activity>
       </application>
    
    </manifest>

其中标签activity ,就是申明注册Activity。android:name,用来指定具体注册的活动。比如上面实例中.MainActivity,标识活动的类名com.jyoryo.app.android.study.MainActivity。由于标签manifest中已经通过package申明了包名,因此注册活动时,包名这一部分就可以省略了。

- 阅读剩余部分 -

通过Android Studio创建的Android项目,都有固定的目录结构。

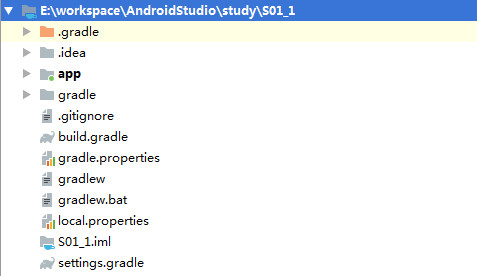
一、项目根目录结构及说明

如下图所示:
AndroidProjectStructure.jpg

  1. .gradle.idea
    这两个目录下都是Android Studio自动生成的一些文件,不用关心,当然也不要去手动编辑。
  2. app
    项目代码、资源等内容几乎都是在这个目录下,我们的开发也基本都是在这个目录下进行。我们会在本会的第二部分还会对该目录下的内容单独说明。
  3. gradle
    这个目录下包含了gradle wrapper的配置文件,使用gradle wrapper的方式不需要提前将gradle下载好,而是自动根据本地缓存情况来确定是否需要联网下载gradle。Android Studio默认没有启用gradle wrapper的方式,如果需要打开,可以点击Android Studio导航栏→File→Settings→Build,Execution,Deployment→Gradle,进行配置修改。
  4. .gitignore
    这个文件是用来指定目录或文件排除在git版本控制之外的。
  5. build.gradle
    项目全局的gradle的构建脚本,通常该文件的内容不需要修改。
  6. gradle.properties
    项目全局的gradle配置文件,在这里配置的属性将会影响到项目中所有gradle编译脚本。
  7. gradlewgradlew.bat
    这两个文件是用在命令行界面中执行gradle命令的。(gradlew:是LinuxMac系统中使用;gradlew.bat:是Windows系统中使用的。)
  8. local.properties
    用于指定本机中的Android SDK路径,通过内容都是自动生成的,我们不需要修改。除非本机中的Android SDK位置发生了变化,可以在这个文件中的路径改为新的位置即可。
  9. settings.gradle
    这个文件指定项目中所有引入的模块。默认新创建的项目只有一个模块,一次该文件仅引入了app这个模块。通常情况下模块引入都是自动完成的,不需要我们手动去修改这个文件。

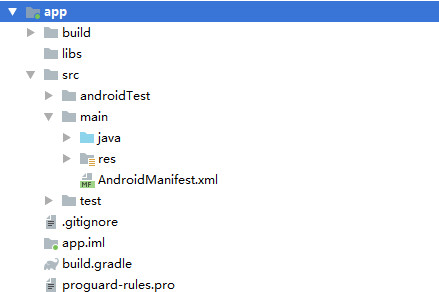
二、项目模块目录结构及说明

如下图示:
AndroidModuleStructure.jpg

  1. build
    这个目录主要包含了一些在编译时自动生成的文件,一般我们不要关心。
  2. libs
    如果项目中需要使用第三方jar包,就需要将这些jar包都放在这个目录。放在这个目录下的jar包都会被自动添加到构建路径里。
  3. src/androidTest
    用来编写AndroidTest测试用例的,可以对项目进行一些自动化测试。
  4. src/main/java
    这个目录是放置我们所有Java代码的地方。
  5. src/main/res
    这个目录下的内容比较多。项目中用到的所有图片、布局、字符串等资源都放在这个目录下。这个目录下还有很多子目录,图片放在drawable目录下,布局放在layout目录下,字符串放在values目录下。
  6. src/main/AndroidManifest.xml
    整个Android项目的配置文件,程序中定义的所有四大组件都需要在这个文件里注册,另外还可以在这个文件中给应用添加权限申明。
  7. src/test
    该目录用来编写Unit Test测试用例的。
  8. gitignore
    这个文件用于将app模块内指定的目录或文件排除在版本控制之外,作用域上层目录的.gitignore类似。
  9. app.iml
    IDE自动生成的文件。
  10. build.gradle
    是app模块的gradle构建脚本,这个文件会指定很多项目构建相关的配置。
  11. proguard-rules.pro
    这个文件用于指定项目代码的混淆规则。如果不希望代码被别人破解,通常会将代码进行混淆。

在项目开发时,我们用的是本地搭建的开发dev环境,开发完成打包部署到服务器时,用到的是服务器prod环境。可以借用Mavenprofilesfiltersresources,在运行或打包时指定选用的环境,实现不同环境自动使用各自环境的配置文件或配置信息。

  • profiles:定义环境变量的id;
  • filters:定义了变量配置文件的地址,其中地址中的环境变量就是上面profile中定义的值;
  • resources:定义哪些目录下的文件会被配置文件中定义的变量替换,另外可以指定目录下的文件打包到classes目录下。

定义环境变量profiles

一般环境变量分:dev开发环境、prod发布环境,当然也可以类比添加其他的环境标志。
此处详细可参看:maven profile动态选择配置文件maven profile切换正式环境和测试环境

    <profiles>
        <!-- 开发测试环境 -->
        <profile>
            <id>dev</id>
            <activation>
                <!-- 设置默认激活dev环境的配置 -->
                <activeByDefault>true</activeByDefault>
            </activation>
            <properties>
                <profile.env>dev</profile.env>
            </properties>
        </profile>
        <!-- 产品发布环境 -->
        <profile>
            <id>prod</id>
            <properties>
                <profile.env>prod</profile.env>
            </properties>
        </profile>
    </profiles>

- 阅读剩余部分 -

背景:在业务中,经常需要在执行数据库操作后(事务提交完成),发送消息或事件来异步调用其他组件执行相应的业务操作。
比如:用户注册成功后,发送激活码或激活邮件,如果用户保存后就执行异步操作发送激活码或激活邮件,但是前面用户保存后发生异常,数据库进行回滚,用户实际没有注册成功,但用户收到激活码或激活邮件。此时,我们就迫切要求数据库事务完成后再执行异步操作。

@Autowired
private UserDao userDao;
@Autowired
private JmsProducer jmsProducer;

public User saveUser(User user) {
    // 保存用户
    userDao.save(user);

    // 发送激活码或激活邮件
    jmsProducer.sendEmail(user.getId());
}

// -------------------------------------
public void sendEmail(int userId) {
    /*
     * 获取待接收邮件的用户。(如果上面的保存用户方法还未提交事务,则实际数据还未插入到数据库中,此时会返回null)
    */
    User user = userDao.get(userId);
    // 可能抛NullPointException
    String email = user.getEmail();
    mailService.send(email);
}

解决方案

1、Spring 4.2之后,使用注解@TransactionalEventListener

/**
 * 业务Service
 */
@Service
@Transactional
public class FooService {
    @Autowired
    private  ApplicationEventPublisher applicationEventPublisher;

    public User saveUser(User user) {
        userDao.save(user);
        // 注册事件
        applicationEventPublisher.publishEvent(new SavedUserEvent(user.getId()));
    }
}

// -------------------------------------
/**
 * 保存用户事件
 */
public class SavedUserEvent {
    private int userId;
    
    public SavedUserEvent(int userId) {
        this.userId = userId;
    }
    
    // getter and setter
}

// ---------------------------------
/**
 * 事件侦听,处理对应事件
 */
@Component
public class FooEventListener() {
    @Autowired
    private UserDao userDao;
    @Autowired
    private MailService mailService;

    @TransactionalEventListener
    public sendEmail(SavedUserEvent savedUserEvent) {
        User user = userDao.get(userId);
        String email = user.getEmail();
        mailService.send(email);
    }
}

2.使用TransactionSynchronizationManager 和 TransactionSynchronizationAdapter

@Autowired
private UserDao userDao;
@Autowired
private JmsProducer jmsProducer;

public User saveUser(User user) {
    // 保存用户
    userDao.save(user);
    final int userId = user.getId();

    // 事务提交后调用
    TransactionSynchronizationManager.registerSynchronization(new TransactionSynchronizationAdapter() {
        @Override
        public void afterCommit() {
            jmsProducer.sendEmail(userId);
        }
    });
}

注意:上面的代码将在事务提交后执行.如果在非事务context中将抛出java.lang.IllegalStateException: Transaction synchronization is not active。
改进后代码:

@Autowired
private UserDao userDao;
@Autowired
private JmsProducer jmsProducer;

public User saveUser(User user) {
    // 保存用户
    userDao.save(user);
    final int userId = user.getId();

    // 兼容无论是否有事务
    if(TransactionSynchronizationManager.isActualTransactionActive()) {
        TransactionSynchronizationManager.registerSynchronization(new TransactionSynchronizationAdapter() {
            @Override
            public void afterCommit() {
                jmsProducer.sendEmail(userId);
            }
        });
    } else {
        jmsProducer.sendEmail(userId);
    }
}

3.在上面2的基础上扩展TransactionSynchronizationAdapter

@Component("afterCommitExecutor")
public class AfterCommitExecutor extends TransactionSynchronizationAdapter implements Executor {
    private static final ThreadLocal<List<Runnable>> RUNNABLES = new ThreadLocal<List<Runnable>>();
    private ThreadPoolExecutor threadPool;

    @PostConstruct
    public void init() {
        Logs.debug("初始化线程池。。。");
        int availableProcessors = Runtime.getRuntime().availableProcessors();
        if (0 >= availableProcessors) {
            availableProcessors = 1;
        }
        int maxPoolSize = (availableProcessors > 5) ? availableProcessors * 2 : 5;
        Logs.debug("CPU Processors :%s MaxPoolSize:%s", availableProcessors, maxPoolSize);
        threadPool = new ThreadPoolExecutor(
            availableProcessors,
            maxPoolSize,
            60,
            TimeUnit.SECONDS,
            new LinkedBlockingQueue<Runnable>(maxPoolSize * 2),
            Executors.defaultThreadFactory(),
            new RejectedExecutionHandler() {
                @Override
                public void rejectedExecution(Runnable r, ThreadPoolExecutor executor) {
                    Logs.debug("Task:%s rejected", r.toString());
                    if (!executor.isShutdown()) {
                        executor.getQueue().poll();
                        executor.execute(r);
                    }
                }
            }
        );
    }

    @PreDestroy
    public void destroy() {
        Logs.debug("销毁线程池。。。");
        if (null != threadPool && !threadPool.isShutdown()) {
            threadPool.shutdown();
        }
    }

    @Override
    public void execute(@NotNull Runnable runnable) {
        if (!TransactionSynchronizationManager.isSynchronizationActive()) {
            runnable.run();
            return;
        }
        List<Runnable> threadRunnables = RUNNABLES.get();
        if (threadRunnables == null) {
            threadRunnables = new ArrayList<Runnable>();
            RUNNABLES.set(threadRunnables);
            TransactionSynchronizationManager.registerSynchronization(this);
        }
        threadRunnables.add(runnable);
    }

    @Override
    public void afterCommit() {
        Logs.debug("事务提交完成处理 ... ");
        List<Runnable> threadRunnables = RUNNABLES.get();
        for (int i = 0; i < threadRunnables.size(); i++) {
            Runnable runnable = threadRunnables.get(i);
            try {
                threadPool.execute(runnable);
            } catch (RuntimeException e) {
                Logs.error("", e);
            }
        }
    }

    @Override
    public void afterCompletion(int status) {
        Logs.debug("事务处理完毕 .... ");
        RUNNABLES.remove();
    }
}

业务层使用:

@Autowired
private UserDao userDao;
@Autowired
private JmsProducer jmsProducer;
@Autowired
private AfterCommitExecutor afterCommitExecutor;

public User saveUser(User user) {
    // 保存用户
    userDao.save(user);
    final int userId = user.getId();

    // 使用AfterCommitExecutor
    afterCommitExecutor.execute(new Runnable() {
        @Override
        public void run() {
            jmsProducer.sendEmail(userId);
        }
    });
  
}

参考文章

Spring的TransactionEventListener
Spring Event 事件中的事务控制
Java Code Examples org.springframework.transaction.support.TransactionSynchronizationAdapter
Spring Events | Baeldung
Thinking about IT: Transaction synchronization callbacks in Spring Framework
散布于应用中的多处的 功能被称为横切关注点。
通过依赖注入(DI),可以对应用中的对象之间进行解耦;通过AOP,可以将关注点与它们所影响的对象之间进行解耦。比如场景:事务、安全、缓存等。
在面向切面编程时,我们可以在集中一个地方定义通用功能,可以通过声明的方式定义这个功能要以何种方式在何处应用,而不用修改受影响的类。

Spring只支持方法级别的连接点

- 阅读剩余部分 -

最近将之前关于Spring的书重新拿出来温故一番,并进行总结。

Bean容器

Spring的Bean容器其实不止一个,归结起来可以分为2类:

  • Bean工厂(由org.springframework.beans.factory.BeanFactory接口定义),是最简单的Bean容器,提供基本的DI支持;
  • 应用上下文(由org.springframework.context.ApplicationContext接口定义),基于BeanFactory构建,提供应用框架级别的服务。

常用应用上下文

  • AnnotationConfigApplicationContext:从一个或多个基于Java的配置类中加载Spring应用上下文;
  • AnnotationConfigWebApplicationContext:从一个或多个基于Java的配置类中加载Spring Web应用上下文;
  • ClassPathXmlApplicationContext:从类路径下的一个或多个Spring的XML配置文件中加载应用上下文;
  • FileSystemXmlApplicationContext:从文件系统下的一个或多个Spring的XML配置文件中加载应用上下文;
  • XmlWebApplicationContext:从Web应用下的一个或多个Spring的XML配置文件中加载应用上下文。

- 阅读剩余部分 -