jyoryo 发布的文章

Docker介绍

Docker是一个应用程序,它简化了在容器中管理应用程序进程的过程。容器允许您在资源隔离的进程中运行应用程序。它们与虚拟机类似,但是容器更可移植、更友好、更依赖于主机操作系统。

Docker安装的要求

系统要求

安装Docker支持如下系统:

  • Debian/Ubuntu Buster 10(stable)
  • Debian/Ubuntu Stretch 9 / Raspbian Stretch

卸载旧的版本(可选)

如果已安装有旧的版本,需要先卸载。卸载命令为:

sudo apt-get remove docker docker-engine docker.io containerd runc

Docker安装

Debian官方中的安装包中的Docker版本不一定是最新的,为了确保我们从Docker官方安装最新的Docker,我们需要添加一个新的包源,从Docker添加GPG密钥以确保下载是有效的,然后安装包。
注:如果是通过root登录的,下面的命令都可以省掉sudo

1. 更新Debian源和安装依赖

sudo apt-get update
sudo apt-get install apt-transport-https ca-certificates curl gnupg-agent software-properties-common

2. 添加GPG Key

curl -fsSL https://download.docker.com/linux/debian/gpg | sudo apt-key add -

3. 将Docker库添加至APT源,注意系统的平台,根据不同平台执行不同的命令

## x86_64 / amd64 平台
sudo add-apt-repository "deb [arch=amd64] https://download.docker.com/linux/debian $(lsb_release -cs) stable"

# armhf 平台
sudo add-apt-repository "deb [arch=armhf] https://download.docker.com/linux/debian $(lsb_release -cs) stable"

# arm64 平台
sudo add-apt-repository "deb [arch=arm64] https://download.docker.com/linux/debian $(lsb_release -cs) stable"
- 阅读剩余部分 -

前言:

备份很重要、备份很重要、备份很重要。(PS:对应备份我也不免入俗了,重要的事情说三遍!!!)
但是我们不用每次都自己操作备份或导出数据文件,可以Shell脚本帮我们自动完成这项重复劳动。

备份数据库前的思考:

  • 确定备份文件存放位置、备份文件名策略、是否自动删除超过指定天数的历史文件。
  • 需要备份哪些数据库还是所有的数据库。
  • 导出备份文件后,是否需要对备份的数据文件进行压缩减小体积。

想清楚上面的几个问题后,就可以着手操作了。

准备条件

使用[mysqldump]配置文件方法

  1. 创建备份专用账号

    CREATE USER 'backupuser'@'localhost' IDENTIFIED BY 'p455w0rd';
    GRANT SELECT, SHOW VIEW, LOCK TABLES, RELOAD, REPLICATION CLIENT ON *.* TO 'backupuser'@'localhost';
    FLUSH PRIVILEGES;
  2. 将1中添加的账号添加至配置文件中

    [mysqldump]
    user=backupuser
    password=p455w0rd

备份脚本

#!/bin/bash

# 直接指定备份数据库使用的用户名、密码。(不建议)
# user="db_username"
# password="db_password"

# 指定备份具体的数据库,多个数据库,中间用空格进分割。如果全部备份可以使用参数 --all-databases
# dbname="db1 db2 db3"

# 指定备份存放目录、备份文件名、备份文件名日期信息
backup_path="/data/bak/db"
backupname="db"
date=$(date "+%Y%m%d")

echo "Backing up mysql databases..."

# 检测是否已存在备份文件,如有,进行删除操作
if [ -f "$backup_path/$backupname-$date.sql.bz2" ]; then
    rm -fv $backup_path/$backupname-$date.sql*
fi

echo "Dumping databases..."

## 直接指定username, password(不推荐)
# mysqldump --user=$user --password=$password --databases $dbname > $backup_path/$backupname-$date.sql

## 将username, password放在配置文件中[mysqldump]下(推荐)
# mysqldump --databases $dbname > $backup_path/$backupname-$date.sql
## 备份所有数据库
mysqldump --all-databases > $backup_path/$backupname-$date.sql

echo "Compressing databases..."
bzip2 $backup_path/$backupname-$date.sql

chmod 600 $backup_path/$backupname-$date.sql.bz2

# Delete files older than 30 days(移除超过30天的历史备份文件)
echo "Checking for old files..."
find $backup_path/* -mtime +30 -exec rm {} \;
echo "Done."

使用Crontab定时执行

进入Crontab编辑模式:

crontab -e

添加定时任务:

# m h  dom mon dow   command
30  1  *   *   *     . /etc/profile; /data/soft/script/mysql_backup.sh > /data/soft/script/mysql_backup.log 2>&1 &

说明:

  • 每天凌晨1:30执行。
  • 由于后台MySQL是使用源码形式安装的,所有MySQL的命令不能直接运行,我在环境变量文件/etc/profile最后添加了export PATH=$PATH:/data/soft/mysql/bin
  • . /etc/profile;,使环境变量生效。
  • 2>&1:如果执行过程中有异常信息,将stderr也重定向标准输出流stdout

恢复数据

通过mysql命令

mysql -u username -p new_database < data-dump.sql

通过source命令:

# 登录数据库
mysql -u root -p

# 切换需要导入数据的数据库
use new_database;

# 通过source快速导入
source {folder_path}/data-dump.sql;

Android中常用的应用都会大量使用网络,比如QQ、微信、访问网页等等。通过使用网络,可以展示网页,发起Http请求获取数据或提交数据。

WebView控件

有时我们可能需要让我们自己的应用展示网页,我们可以使用Android内置的控件WebView

public class MainActivity extends AppCompatActivity {

    @Override
    protected void onCreate(Bundle savedInstanceState) {
        super.onCreate(savedInstanceState);
        setContentView(R.layout.activity_main);

        WebView webView = (WebView)findViewById(R.id.web_view);
        webView.getSettings().setJavaScriptEnabled(true);
        webView.setWebViewClient(new WebViewClient());
        webView.loadUrl("http://www.baidu.com");
    }
}

布局文件:

<?xml version="1.0" encoding="utf-8"?>
<LinearLayout xmlns:android="http://schemas.android.com/apk/res/android"
    android:orientation="vertical"
    android:layout_width="match_parent"
    android:layout_height="match_parent">

    <WebView
        android:id="@+id/web_view"
        android:layout_width="match_parent"
        android:layout_height="match_parent" />
</LinearLayout>

由于使用了网络功能,需要声明网络权限。在AndroidManifest.xml添加android.permission.INTERNET:

<?xml version="1.0" encoding="utf-8"?>
<manifest xmlns:android="http://schemas.android.com/apk/res/android"
    package="com.jyoryo.app.android.study">

    <uses-permission android:name="android.permission.INTERNET" />

    <application
        android:allowBackup="true"
        android:icon="@mipmap/ic_launcher"
        android:label="@string/app_name"
        android:roundIcon="@mipmap/ic_launcher_round"
        android:supportsRtl="true"
        android:theme="@style/AppTheme">
        <activity android:name=".MainActivity">
            <intent-filter>
                <action android:name="android.intent.action.MAIN" />
                <category android:name="android.intent.category.LAUNCHER" />
            </intent-filter>
        </activity>
    </application>

</manifest>

- 阅读剩余部分 -

内容提供器Content Provider用于不同程序之间进行数据共享:允许其它程序访问操作提供内容提供器的程序,同时保证提供被访问的数据的安全性。

内容提供器Content Provider一般有两种用法:

  • 使用其他现有提供内容提供器的程序来读取和操作该程序的数据;
  • 自身程序创建内容提供器供其他程序读取和操作自身程序的数据,即对外提供接口。

比如常用的电话簿、短信、媒体库等都提供了内容提供器供其他程序读取和操作数据。

内容提供器Content Provider基本用法

通过Context中的getContentResolver()获取ContentResolver类的实例来访问其他程序的内容提供器的数据,进行相关CRUD操作。相关方法与SQLiteDatabase基本相同,只不过方法参数有些不同。

  • insert():添加数据;
  • update():更新数据;
  • delete():删除数据;
  • query():查询数据。

ContentResolverCRUD操作不接受表名,而是使用Uri参数(内容URI)。内容URI给内容提供器提供了唯一标志符,它是有两部分组成:authoritypath

  • authority:用于区分应用程序,一般为了更好的区分,都会采用程序包名再加上provider来命名。比如程序的包名com.demo.app,那么该程序的authority可以命名为com.demo.app.provider
  • path:用于区分同一程序中不同表,通常都会添加在authority后面。比如程序存在2张表table1table2,对应的path就可以分别命名为/table1/table2
  • 内容URI:是将上面的authoritypath进行组合,然后再在头部加上协议声明。比如content://com.demo.app.provider/table1content://com.demo.app.provider/table2

- 阅读剩余部分 -

Android自发布以来就已经存在权限,但是之前版本(Android 6.0以前)对用户安全和隐私数据保护是很有限的,特别是常用离不开的App,很容易造成用户数据泄露。为了解决这个问题,Android6.0开始引入运行时权限

Android权限机制

Android中如果要访问网络、监听开机广播、监听来电或者短信息、监听网络变化等等,就必须在AndroidManifest.xml文件中添加权限声明,比如:

<!-- 网络状态 -->
<uses-permission android:name="android.permission.ACCESS_NETWORK_STATE" />
<!-- 系统开机 -->
<uses-permission android:name="android.permission.RECEIVE_BOOT_COMPLETED" />

运行时权限:用户在安装软件的时候可以不用一次性授权所有权限,而是在软件的实际使用过程中再逐一对某一权限进行申请授权。
Android的权限可以归为2类:普通权限、危险权限。

普通权限:不会直接威胁到用户安全和隐私的权限,对于这部分权限,系统会自动帮我们进行授权,而不用用户进行手动全操作授权;

危险权限:是指会获取用户敏感数据或对设备安全性造成影响的权限,如联系人、定位位置、拨打电话等,对于这部分权限,必须由用户进行手动点击进行授权,否则程序无法使用该权限对应的功能。

危险权限一共是9组24个权限,9组分别为日历、拍照、联系人、位置、麦克风、电话、传感器、短信及存储:

- 阅读剩余部分 -

Android中针对数据的持久化存储主要提供了3种:文件存储SharedPreference存储SQLite数据库存储。除了上面3种外,也可也将数据保存在设备的SD卡中,不过使用这3种相对更简单易用。

文件存储

Android中对文件存储的内容不进行任何格式化处理,所有的数据都是原样保存至文件中,因此比较适合存储一些文本内容或二进制数据。
存储的文件默认都是存储在路径:/data/data/{package_name}/files这个目录下,{package_name}为程序的包名。

将数据保存至文件

Context类中提供openFileOutput()方法,获取向文件写入数据的输出流。方法需要2个参数:第一个参数是文件名;第二个参数是写入模式,主要有2种(MODE_PRIVATEMODE_APPEND)。
MODE_PRIVATE:是默认的写入模式,该模式下,如果存在同名的时候,会将写入的内容完全覆盖源文件的内容。
MODE_APPEND:如果已存在该文件,就往该文件追加写入数据;如果文件不存在,则新建该文件。

    private void save(String content) {
        FileOutputStream out = null;
        BufferedWriter writer = null;
        try {
            out = openFileOutput("data", Context.MODE_PRIVATE);
            writer = new BufferedWriter(new OutputStreamWriter(out));
            writer.write(content);
        } catch (FileNotFoundException e) {
            e.printStackTrace();
        } catch (IOException e) {
            e.printStackTrace();
        } finally {
            try {
                if(null != writer) {
                    writer.close();
                }
                if(null != out) {
                    out.close();
                }
            } catch (IOException e) {
                e.printStackTrace();
            }
        }
    }

从文件中读取数据

Context类中提供openFileInput()方法,获取从文件读取数据的输入流。

    private String load() {
        FileInputStream in = null;
        BufferedReader reader = null;
        StringBuilder sbd = new StringBuilder();
        try {
            in = openFileInput("data");
            reader = new BufferedReader(new InputStreamReader(in));
            String line = "";
            while (null != (line = reader.readLine())) {
                sbd.append(line);
            }
        } catch (FileNotFoundException e) {
            e.printStackTrace();
        } catch (IOException e) {
            e.printStackTrace();
        } finally {
            try {
                if(null != reader) {
                    reader.close();
                }
                if(null != in) {
                    in.close();
                }
            } catch (IOException e) {
                e.printStackTrace();
            }
        }
        return sbd.toString();
    }

- 阅读剩余部分 -

在上篇文章中对四大组件之Activity进行进行总结,这篇文章是对另一个四大组件Broadcast 广播进行总结。

广播类型

广播可以分为两种类型:

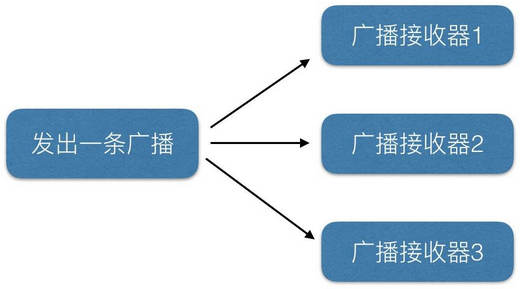
  • Normal broadcasts 标准广播:完全异步的,广播发出后,所有的广播接收器几乎都会在同一时刻收到这条广播消息。它的特点是,广播效率高,但是无法被截断。
    NormalBroadcasts.jpg
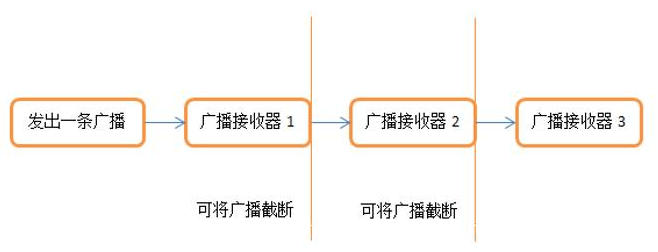
  • Ordered broadcasts 有序广播:同步执行的,广播发出后,同一时刻只能有一个广播接收器能够收到这条广播消息,只有当该广播接收器的逻辑处理完成后,广播才会继续传递给下一个广播接收器。优先级越高的广播接收器会优先接收到广播消息,另外广播接收器还可以对广播进行截断,这样后面的广播接收器就无法收到该广播消息。
    OrderBroadcasts.jpg

- 阅读剩余部分 -

Fragment碎片是可嵌入到活动中的UI片段,能让程序更加合理利用大屏幕。

Fragment基本用法

在一个活动中添加2个Fragment,这两个Fragment平方活动空间。
1、创建左侧的Fragment布局left_fragment.xml

<?xml version="1.0" encoding="utf-8"?>
<LinearLayout xmlns:android="http://schemas.android.com/apk/res/android"
    android:orientation="vertical"
    android:layout_width="match_parent"
    android:layout_height="match_parent">

    <Button
        android:id="@+id/button"
        android:layout_width="wrap_content"
        android:layout_height="wrap_content"
        android:layout_gravity="center_horizontal"
        android:text="Button"/>
</LinearLayout>

创建右侧的Fragment布局right_fragment.xml

<?xml version="1.0" encoding="utf-8"?>
<LinearLayout xmlns:android="http://schemas.android.com/apk/res/android"
    android:orientation="vertical"
    android:background="#00ff00"
    android:layout_width="match_parent"
    android:layout_height="match_parent">

    <TextView
        android:layout_width="wrap_content"
        android:layout_height="wrap_content"
        android:layout_gravity="center_horizontal"
        android:textSize="20sp"
        android:text="This is right fragment."/>
</LinearLayout>

2、创建Fragment类
左侧Fragment类LeftFragment:

public class LeftFragment extends Fragment {
    @Override
    public View onCreateView(LayoutInflater inflater, ViewGroup container, Bundle savedInstanceState) {
        View view = inflater.inflate(R.layout.left_fragment, container, false);
        return view;
    }
}

右侧Fragment类RightFragment:

public class RightFragment extends Fragment {
    @Override
    public View onCreateView(LayoutInflater inflater, ViewGroup container, Bundle savedInstanceState) {
        View view = inflater.inflate(R.layout.right_fragment, container, false);
        return view;
    }
}

3、在活动布局中添加Fragment

<?xml version="1.0" encoding="utf-8"?>
<LinearLayout xmlns:android="http://schemas.android.com/apk/res/android"
    android:orientation="horizontal"
    android:layout_width="match_parent"
    android:layout_height="match_parent">

    <fragment
        android:id="@+id/left_fragment"
        android:name="com.jyoryo.app.android.study.LeftFragment"
        android:layout_width="0dp"
        android:layout_height="match_parent"
        android:layout_weight="1"/>

    <fragment
        android:id="@+id/right_fragment"
        android:name="com.jyoryo.app.android.study.RightFragment"
        android:layout_width="0dp"
        android:layout_height="match_parent"
        android:layout_weight="1"/>
</LinearLayout>

- 阅读剩余部分 -

通过Android Studio可视化编辑器可以通过拖拽方式完成界面布局,但这种方式生成的界面通常不具有很好的屏幕适配性,而且编写较为复杂界面时,通过可视化编辑器实现效果也不好。建议新手还是通过xml方式编写界面。通过Android Studio强大的智能提示,使用xml方式编写界面也是很方便的。

Android常用控件

TextView

TextView应该是最常用的一个控件,用来显示一段文本内容。简单的TextView用法如下:

    <TextView
        android:id="@+id/text_view_1"
        android:layout_width="match_parent"
        android:layout_height="wrap_content"
        android:text="This is a TextView1!" />

    <TextView
        android:id="@+id/text_view_2"
        android:layout_width="match_parent"
        android:layout_height="wrap_content"
        android:gravity="center"
        android:text="This is a TextView2!" />

    <TextView
        android:id="@+id/text_view_3"
        android:layout_width="match_parent"
        android:layout_height="wrap_content"
        android:gravity="center"
        android:textSize="24sp"
        android:textColor="#00ff00"
        android:text="This is a TextView3!" />
  • android:id:给控件定义一个唯一标识符;
  • android:layout_widthandroid:layout_height:定义控件宽度和高度,可选择有wrap_contentmatch_parent,和fill_parent,一般用wrap_contentmatch_parent
  • android:text:定义控件显示的文本内容;
  • android:gravity:指定控件文字的对齐方式,可选择有topbottomleftrightcentercenter_horizontalcenter_vertical等,可以用管道符"|"来同时指定多个值;
  • android:textSize:定义文字的大小;
  • android:textColor:定义文字颜色。

- 阅读剩余部分 -

Android四大组件:Activity(活动)Service(服务)Broadcast Receiver(广播接收器)Content Provider(内容提供器)

  • Activity(活动)
    Activity活动是所有Android应用的界面显示,凡是应用中能看到的内容,都是放在活动中。
  • Service(服务)
    Service服务无法看到,但是它会一直在后台默默地运行。
  • Broadcast Receiver(广播接收器)
    Broadcast Receiver广播接收器运行应用接收来自各处的广播消息,比如:电话、短信等。我们应用也可以自己定义广播消息对外广播发送。
  • Content Provider(内容提供器)
    Content Provider内容提供器为应用之间共享数据提供了可能。比如访问系统电话簿中的联系人,就需要通过内容提供器来实现。

本文是对Activity(活动)的总结。

活动的创建

  1. 创建活动Activity的类。例如:

    public class MainActivity extends AppCompatActivity {
       private static final String TAG = "MainActivity";
       
       @Override
       protected void onCreate(Bundle savedInstanceState) {
           super.onCreate(savedInstanceState);
           setContentView(R.layout.activity_main);
       }
    }
  2. 创建活动的布局(视图)

    <?xml version="1.0" encoding="utf-8"?>
    <LinearLayout xmlns:android="http://schemas.android.com/apk/res/android"
       android:orientation="vertical"
       android:layout_width="match_parent"
       android:layout_height="match_parent">
    
       <TextView
           android:layout_width="match_parent"
           android:layout_height="wrap_content"
           android:text="This is a activity!" />
    </LinearLayout>
  3. AndroidManifest.xml中进行注册。

    <?xml version="1.0" encoding="utf-8"?>
    <manifest xmlns:android="http://schemas.android.com/apk/res/android"
       package="com.jyoryo.app.android.study">
    
       <application
           android:allowBackup="true"
           android:icon="@mipmap/ic_launcher"
           android:label="@string/app_name"
           android:roundIcon="@mipmap/ic_launcher_round"
           android:supportsRtl="true"
           android:theme="@style/AppTheme">
           <activity android:name=".MainActivity">
               <intent-filter>
                   <action android:name="android.intent.action.MAIN" />
                   <category android:name="android.intent.category.LAUNCHER" />
               </intent-filter>
           </activity>
       </application>
    
    </manifest>

其中标签activity ,就是申明注册Activity。android:name,用来指定具体注册的活动。比如上面实例中.MainActivity,标识活动的类名com.jyoryo.app.android.study.MainActivity。由于标签manifest中已经通过package申明了包名,因此注册活动时,包名这一部分就可以省略了。

- 阅读剩余部分 -