Debian Ubuntu下最新版 6.x Redis源码安装
Debian Ubuntu下Redis源码安装
安装依赖
# 更新
apt-get update
# 安装依赖工具
apt-get install -y build-essential tcl pkg-config
安装Redis
工作目录未/tmp
cd /tmp
# 下载
wget https://download.redis.io/releases/redis-6.2.1.tar.gz
# 解压
tar zxf redis-6.2.1.tar.gz
# 进入源码文件目录
cd redis-6.2.1/
# 编译源码
make
# 测试
make test
# 测试通过后,进行安装redis
make install
make test 完成

配置Redis
设置配置文件redis.conf
# 创建存放redis目录
mkdir /etc/redis
# 拷贝配置文件
cp /tmp/redis-6.2.1/redis.conf /etc/redis/
# 编辑redis配置信息
vim /etc/redis/redis.conf设置redis.conf配置内容:
# 配置redis端口号
port 6379

# 配置redis以后台进程运行
daemonize yes

# 如果redis以后台进程运行,配置pid文件
pidfile /var/run/redis_6379.pid

# 配置db文件名(默认不用更改)
dbfilename dump.rdb

# 日志文件 需要确认该目录已被创建:mkdir -p /var/log/redis
logfile /var/log/redis/redis-server.log

# 配置redis工作目录
# 运行redis前,需要确认该目录已被创建:mkdir -p /var/lib/redis
dir /var/lib/redis
运行测试
# 启动redis,后面为我们指定的配置文件
/usr/local/bin/redis-server /etc/redis/redis.conf

# 查看端口占用情况
lsof -i :6379

# 客户端连接redis 服务
/usr/local/bin/redis-cli -p 6379

127.0.0.1:6379> ping
PONG
127.0.0.1:6379> SHUTDOWN
not connected> exit
配置redis作为系统服务
编辑配置文件:/etc/redis/redis.conf
# By default Redis does not run as a daemon. Use 'yes' if you need it.
# Note that Redis will write a pid file in /var/run/redis.pid when daemonized.
# When Redis is supervised by upstart or systemd, this parameter has no impact.
daemonize no

# If you run Redis from upstart or systemd, Redis can interact with your
# supervision tree. Options:
#   supervised no      - no supervision interaction
#   supervised upstart - signal upstart by putting Redis into SIGSTOP mode
#                        requires "expect stop" in your upstart job config
#   supervised systemd - signal systemd by writing READY=1 to $NOTIFY_SOCKET
#                        on startup, and updating Redis status on a regular
#                        basis.
#   supervised auto    - detect upstart or systemd method based on
#                        UPSTART_JOB or NOTIFY_SOCKET environment variables
# Note: these supervision methods only signal "process is ready."
#       They do not enable continuous pings back to your supervisor.
#
# The default is "no". To run under upstart/systemd, you can simply uncomment
# the line below:
#
supervised systemd
添加systemd文件
# 创建文件
touch /etc/systemd/system/redis.service

# 编辑文件
vim /etc/systemd/system/redis.service
[Unit]
Description=Redis In-Memory Data Store
After=network.target
[Service]
User=redis
Group=redis
ExecStart=/usr/local/bin/redis-server /etc/redis/redis.conf
ExecStop=/usr/local/bin/redis-cli shutdown
Restart=always
[Install]
WantedBy=multi-user.target为redis创建用户
# 添加用户redis
adduser --system --group --no-create-home redis

# 修改目录/var/lib/redis 用户即访问权限
chown redis:redis /var/lib/redis
chmod 770 /var/lib/redis

# 可选 日志目录/var/log/redis
chown redis:redis /var/log/redis
chmod 770 /var/log/redis
root@docker00:/etc/systemd/system# adduser --system --group --no-create-home redis
Adding system user `redis' (UID 107) ...
Adding new group `redis' (GID 111) ...
Adding new user `redis' (UID 107) with group `redis' ...
Not creating home directory `/home/redis'.运行测试
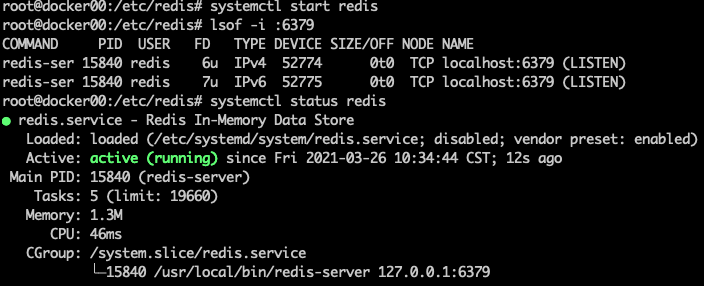
root@docker00:/etc/redis# systemctl start redis
root@docker00:/etc/redis# lsof -i :6379
COMMAND     PID  USER   FD   TYPE DEVICE SIZE/OFF NODE NAME
redis-ser 15818 redis    6u  IPv4  52521      0t0  TCP localhost:6379 (LISTEN)
redis-ser 15818 redis    7u  IPv6  52522      0t0  TCP localhost:6379 (LISTEN)
root@docker00:/etc/redis# systemctl status redis
redis作为系统服务
root@docker00:~# systemctl enable redis
Created symlink /etc/systemd/system/multi-user.target.wants/redis.service → /etc/systemd/system/redis.service.
很实用,学习中
叼茂SEO.bfbikes.com
看的我热血沸腾啊https://www.jiwenlaw.com/
你的文章内容非常卖力,让人点赞。http://www.gahaiqinaili.com
你的文章让我感受到了正能量,非常棒! http://www.55baobei.com/76ZaV2qX4J.html
真棒!
你的才华让人惊叹,请继续保持。 https://www.4006400989.com/qyvideo/6442.html
你的文章内容非常精彩,让人回味无穷。 https://www.4006400989.com/qyvideo/94799.html
文献引用规范,学术态度严谨,值得借鉴。
选材新颖独特,通过细节描写赋予主题鲜活生命力。
文章紧扣主题,观点鲜明,展现出深刻的思考维度。
寻找华纳圣淘沙公司开户代理(183-8890-9465薇-STS5099】
华纳圣淘沙官方合作开户渠道(183-8890-9465薇-STS5099】
华纳圣淘沙公司开户代理服务(183-8890-9465薇-STS5099】
华纳圣淘沙公司开户咨询热线(183-8890-9465薇-STS5099】
联系客服了解华纳圣淘沙开户
(183-8890-9465薇-STS5099】
华纳圣淘沙公司开户专属顾问
(183-8890-9465薇-STS5099】
寻找华纳圣淘沙公司开户代理(183-8890-9465薇-STS5099】
华纳圣淘沙官方合作开户渠道(183-8890-9465薇-STS5099】
华纳圣淘沙公司开户代理服务(183-8890-9465薇-STS5099】
华纳圣淘沙公司开户咨询热线(183-8890-9465薇-STS5099】
联系客服了解华纳圣淘沙开户
(183-8890-9465薇-STS5099】
华纳圣淘沙公司开户专属顾问
(183-8890-9465薇-STS5099】
呈贡聚贤街哪个巷子好玩a0gy.cn