分类 Tools 下的文章

Nginx搭建WebDAV服务器

搭建webDAV服务前,先确认已安装nginx

配置webdav.conf

创建用于webdav的nginx配置文件:

vim /etc/nginx/conf.d/webdav.conf

设置内容:

server {
    listen 80;
    listen [::]:80;

    server_name webdav.youdomain.com;

    # 认证方式
    auth_basic              realm_name;
    # 存放认证用户名、密码文件(确认有对应权限)
    auth_basic_user_file    /data/www/webdav/.credentials.list;
    root /data/www/webdav/;

    # dav allowed method
    dav_methods     PUT DELETE MKCOL COPY MOVE;
    # Allow current scope perform specified DAV method
    dav_ext_methods PROPFIND OPTIONS;

    # In this folder, newly created folder or file is to have specified permission. If none is given, default is user:rw. If all or group permission is specified, user could be skipped
    dav_access      user:rw group:rw all:r;

    # MAX size of uploaded file, 0 mean unlimited
    client_max_body_size    0;

    # Allow autocreate folder here if necessary
    create_full_put_path    on;
}

创建用户

用户名

echo -n '$yourname:' | tee -a /data/www/webdav/.credentials.list

设置密码

openssl passwd -apr1 | tee -a /data/www/webdav/.credentials.list

重新加载nginx

# 检验配置文件
nginx -t

# 重启nginx
nginx -s reload

参考文章

vim使用

vim-key

官方文档:http://vimdoc.sourceforge.net/htmldoc/ 中文文档:http://vimcdoc.sourceforge.net/doc/

vim配置

vim 的配置文件分为系统配置文件 /etc/vimrc/usr/share/vim/ 和用户配置文件 ~/.vimrc~/.vim/

vim 的配置文件载入过程为:

  1. /etc/vimrc
  2. $HOME/.vim, $HOME/.vimrc
  3. $VIMRUNTIME/.vim,$VIMRUNTIME/.vimrc
  4. $HOME/.vim/after/
通过vim -V可以查看整个初始化过程。

vim常用的一些配置选项:

" .vimrc
" See: http://vimdoc.sourceforge.net/htmldoc/options.html for details
" For multi-byte character support (CJK support, for example):
" set fileencodings=ucs-bom,utf-8,cp936,big5,euc-jp,euc-kr,gb18030,latin1       
set tabstop=4       " Number of spaces that a <Tab> in the file counts for.

set shiftwidth=4    " Number of spaces to use for each step of (auto)indent.
 
set expandtab       " Use the appropriate number of spaces to insert a <Tab>.
                    " Spaces are used in indents with the '>' and '<' commands
                    " and when 'autoindent' is on. To insert a real tab when
                    " 'expandtab' is on, use CTRL-V <Tab>.
 
set smarttab        " When on, a <Tab> in front of a line inserts blanks
                    " according to 'shiftwidth'. 'tabstop' is used in other
                    " places. A <BS> will delete a 'shiftwidth' worth of space
                    " at the start of the line.
 
set showcmd         " Show (partial) command in status line.

set number          " Show line numbers.

set showmatch       " When a bracket is inserted, briefly jump to the matching
                    " one. The jump is only done if the match can be seen on the
                    " screen. The time to show the match can be set with
                    " 'matchtime'.
 
set hlsearch        " When there is a previous search pattern, highlight all
                    " its matches.
 
set incsearch       " While typing a search command, show immediately where the
                    " so far typed pattern matches.
 
set ignorecase      " Ignore case in search patterns.
 
set smartcase       " Override the 'ignorecase' option if the search pattern
                    " contains upper case characters.
 
set backspace=2     " Influences the working of <BS>, <Del>, CTRL-W
                    " and CTRL-U in Insert mode. This is a list of items,
                    " separated by commas. Each item allows a way to backspace
                    " over something.
 
set autoindent      " Copy indent from current line when starting a new line
                    " (typing <CR> in Insert mode or when using the "o" or "O"
                    " command).
 
set textwidth=79    " Maximum width of text that is being inserted. A longer
                    " line will be broken after white space to get this width.
 
set formatoptions=c,q,r,t " This is a sequence of letters which describes how
                    " automatic formatting is to be done.
                    "
                    " letter    meaning when present in 'formatoptions'
                    " ------    ---------------------------------------
                    " c         Auto-wrap comments using textwidth, inserting
                    "           the current comment leader automatically.
                    " q         Allow formatting of comments with "gq".
                    " r         Automatically insert the current comment leader
                    "           after hitting <Enter> in Insert mode. 
                    " t         Auto-wrap text using textwidth (does not apply
                    "           to comments)
 
set ruler           " Show the line and column number of the cursor position,
                    " separated by a comma.
 
set background=dark " When set to "dark", Vim will try to use colors that look
                    " good on a dark background. When set to "light", Vim will
                    " try to use colors that look good on a light background.
                    " Any other value is illegal.
 
set mouse=a         " Enable the use of the mouse.
 
filetype plugin indent on
syntax on

vim光标移动

常用移动:

h,j,k,l:分别对应光标⬅️,⬇️,⬆️,➡️。

w,b,$,^,gg,G:分别对应下一单词,前一单词,行末,行首,文件头,文件末尾。

- 阅读剩余部分 -

清除SVN版本控制

关于清除SVN版本控制,本人目前是采用如下方法:通过运行一个.bat文件,删除此目录下所有.svn的文件夹包括子目录下的.svn文件夹

简易版

新建一个clean.bat的文件,用记事本打开,写入:

@echo On @Rem 删除SVN版本控制目录 @PROMPT [Com]
@for /r . %%a in (.) do @if exist "%%a\.svn" rd /s /q "%%a\.svn" @Rem for /r . %%a in (.) do @if exist "%%a\.svn" @echo "%%a\.svn"
@echo Mission Completed. @pause

完整版

@echo off
echo ***********************************************************
echo 清除SVN版本信 息
echo ***********************************************************
:start
::启动过程,切换目录
:set pwd=%cd%
:cd %1
echo 工作目录是:& chdir
:input
::获取输入,根据输入进行处理
set source=:
set /p source=确定要清楚当前目录下的.svn信息吗?[Y/N/Q]
set "source=%source:"=%"
if "%source%"=="y" goto clean
if "%source%"=="Y" goto clean
if "%source%"=="n" goto noclean
if "%source%"=="N" goto noclean
if "%source%"=="q" goto end
if "%source%"=="Q" goto end
goto input
:clean
::主处理过程,执行清理工作
@echo on
@for /d /r %%c in (.svn) do @if exist %%c ( rd /s /q %%c & echo 删除目录%%c)
@echo off
echo "当前目录下的svn信息已清除"
goto end
:noclean
::分支过程,取消清理工作
echo "svn信息清楚操作已取消"
goto end
:end
::退出程序
cd "%pwd%"
pause

Lombok介绍

Lombok 是一种 Java 实用工具,可用来帮助开发人员消除 Java 的冗长,尤其是对于简单的 Java 对象(POJO)。它通过注释实现这一目的。通过在开发环境中实现 Lombok,开发人员可以节省构建诸如 hashCode() 和 equals() 这样的方法以及以往用来分类各种 accessor 和 mutator 的大量时间。

SpringToolSuite4安装Lombok

下载 lombok.jar

可以通过下面地址进行下载:

https://repo1.maven.org/maven2/org/projectlombok/lombok/1.18.18/lombok-1.18.18.jar

拷贝lombok.jar至STS目录

目录:/Applications/SpringToolSuite4.app/Contents/MacOS

接着需要将lombok-1.18.18.jar重命名为lombok.jar
(下面截图名称没有改,实际操作时,请将lombok-1.18.18.jar改为lombok.jar)

7c2yiab8hz4.png

在STS路径运行命令

cd /Applications/SpringToolSuite4.app/Contents/MacOS

java -jar lombok.jar

- 阅读剩余部分 -

Docker介绍

Docker是一个开源的应用容器引擎,基于 Go 语言 并遵从 Apache2.0 协议开源。
Docker 可以让开发者打包他们的应用以及依赖包到一个轻量级、可移植的容器中,然后发布到任何流行的 Linux 机器上,也可以实现虚拟化。
容器是完全使用沙箱机制,相互之间不会有任何接口(类似 iPhone 的 app),更重要的是容器性能开销极低。

文档地址:https://docs.docker.com/

仓库地址:https://hub.docker.com/

Docker入门

基本概念

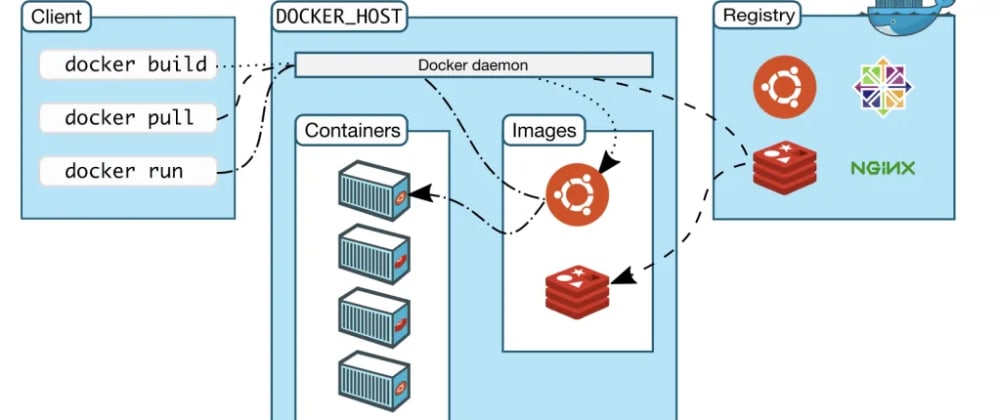
Docker基本组成:

Cover image for Getting Started with Docker for Developers

镜像 image

docker 镜像好比一个模板,可以通过这个目标创建容器服务。比如:nginx镜像 ===》run命令 ===》nginx01容器(提供服务)

容器 container

docker利用容器技术,独立运行一个或一组应用。容器是通过镜像创建的。

容器基本命令有:启动、停止、删除

仓库 repository

仓库是用来存放镜像的地方。

仓库可以分为:共有仓库、私有仓库。

Docker安装

Debian系统安装:

官方文档:https://docs.docker.com/engine/install/

# 卸载旧版本
apt-get remove docker docker-engine docker.io containerd runc

# 安装相关依赖和工具
apt-get install -y apt-transport-https ca-certificates curl gnupg lsb-release software-properties-common

# ######我们用阿里云替换官方###########
# 添加阿里云GPG key  https://mirrors.aliyun.com/docker-ce/linux/debian/
curl -fsSL http://mirrors.aliyun.com/docker-ce/linux/debian/gpg | apt-key add -
# 写入软件源信息
add-apt-repository "deb [arch=amd64] http://mirrors.aliyun.com/docker-ce/linux/debian $(lsb_release -cs) stable"

# ####默认使用官方源下载,####
# 添加Docker官方GPG key
curl -fsSL https://download.docker.com/linux/debian/gpg | gpg --dearmor -o /usr/share/keyrings/docker-archive-keyring.gpg
# 写入软件源信息
echo \
  "deb [arch=amd64 signed-by=/usr/share/keyrings/docker-archive-keyring.gpg] https://download.docker.com/linux/debian \
  $(lsb_release -cs) stable" | tee /etc/apt/sources.list.d/docker.list > /dev/null

# 安装Docker
apt-get update
apt-get install -y docker-ce docker-ce-cli containerd.io

# 配置镜像加速 可以在阿里云中的容器镜像服务下的镜像加速器替换"https://xxxxx.mirror.aliyuncs.com"
mkdir -p /etc/docker
tee /etc/docker/daemon.json <<-'EOF'
{
  "registry-mirrors": ["https://xxxxx.mirror.aliyuncs.com"]
}
EOF

# 重启docker
systemctl daemon-reload
systemctl restart docker

- 阅读剩余部分 -

前言:

备份很重要、备份很重要、备份很重要。(PS:对应备份我也不免入俗了,重要的事情说三遍!!!)
但是我们不用每次都自己操作备份或导出数据文件,可以Shell脚本帮我们自动完成这项重复劳动。

备份数据库前的思考:

  • 确定备份文件存放位置、备份文件名策略、是否自动删除超过指定天数的历史文件。
  • 需要备份哪些数据库还是所有的数据库。
  • 导出备份文件后,是否需要对备份的数据文件进行压缩减小体积。

想清楚上面的几个问题后,就可以着手操作了。

准备条件

使用[mysqldump]配置文件方法

  1. 创建备份专用账号

    CREATE USER 'backupuser'@'localhost' IDENTIFIED BY 'p455w0rd';
    GRANT SELECT, SHOW VIEW, LOCK TABLES, RELOAD, REPLICATION CLIENT ON *.* TO 'backupuser'@'localhost';
    FLUSH PRIVILEGES;
  2. 将1中添加的账号添加至配置文件中

    [mysqldump]
    user=backupuser
    password=p455w0rd

备份脚本

#!/bin/bash

# 直接指定备份数据库使用的用户名、密码。(不建议)
# user="db_username"
# password="db_password"

# 指定备份具体的数据库,多个数据库,中间用空格进分割。如果全部备份可以使用参数 --all-databases
# dbname="db1 db2 db3"

# 指定备份存放目录、备份文件名、备份文件名日期信息
backup_path="/data/bak/db"
backupname="db"
date=$(date "+%Y%m%d")

echo "Backing up mysql databases..."

# 检测是否已存在备份文件,如有,进行删除操作
if [ -f "$backup_path/$backupname-$date.sql.bz2" ]; then
    rm -fv $backup_path/$backupname-$date.sql*
fi

echo "Dumping databases..."

## 直接指定username, password(不推荐)
# mysqldump --user=$user --password=$password --databases $dbname > $backup_path/$backupname-$date.sql

## 将username, password放在配置文件中[mysqldump]下(推荐)
# mysqldump --databases $dbname > $backup_path/$backupname-$date.sql
## 备份所有数据库
mysqldump --all-databases > $backup_path/$backupname-$date.sql

echo "Compressing databases..."
bzip2 $backup_path/$backupname-$date.sql

chmod 600 $backup_path/$backupname-$date.sql.bz2

# Delete files older than 30 days(移除超过30天的历史备份文件)
echo "Checking for old files..."
find $backup_path/* -mtime +30 -exec rm {} \;
echo "Done."

使用Crontab定时执行

进入Crontab编辑模式:

crontab -e

添加定时任务:

# m h  dom mon dow   command
30  1  *   *   *     . /etc/profile; /data/soft/script/mysql_backup.sh > /data/soft/script/mysql_backup.log 2>&1 &

说明:

  • 每天凌晨1:30执行。
  • 由于后台MySQL是使用源码形式安装的,所有MySQL的命令不能直接运行,我在环境变量文件/etc/profile最后添加了export PATH=$PATH:/data/soft/mysql/bin
  • . /etc/profile;,使环境变量生效。
  • 2>&1:如果执行过程中有异常信息,将stderr也重定向标准输出流stdout

恢复数据

通过mysql命令

mysql -u username -p new_database < data-dump.sql

通过source命令:

# 登录数据库
mysql -u root -p

# 切换需要导入数据的数据库
use new_database;

# 通过source快速导入
source {folder_path}/data-dump.sql;

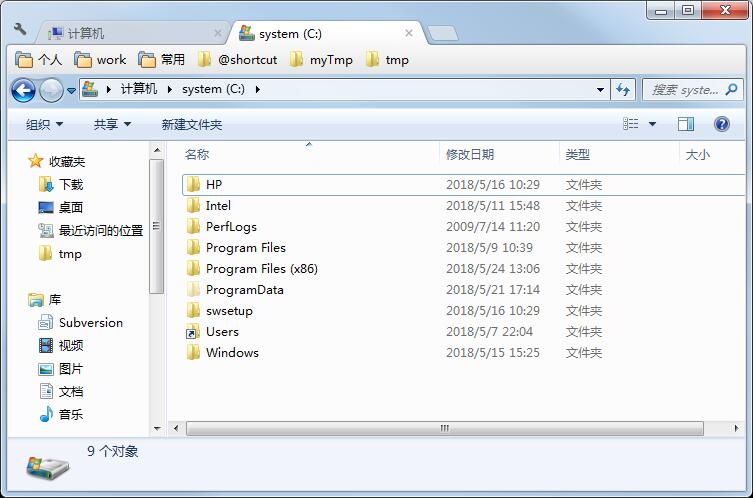
开始菜单的所有程序

C:\Users\{user}\AppData\Roaming\Microsoft\Windows
将上面的{user}替换为自己的登录系统的用户名。

工具:certutil

  1. SHA1

    certutil -hashfile test.rar

    SHA1.bmp

  2. SHA256

    certutil -hashfile test.rar SHA256

    SHA256.bmp

  3. MD5

    certutil -hashfile test.rar MD5

    MD5.bmp

  4. base64编码转换

    ccertutil -encode test.txt out.txt

    Base64Encode.bmp

  5. base64解码

    certutil -decode input.txt out.txt

    Base64Decode.bmp