分类 Server 下的文章

Nginx搭建WebDAV服务器

搭建webDAV服务前,先确认已安装nginx

配置webdav.conf

创建用于webdav的nginx配置文件:

vim /etc/nginx/conf.d/webdav.conf

设置内容:

server {
    listen 80;
    listen [::]:80;

    server_name webdav.youdomain.com;

    # 认证方式
    auth_basic              realm_name;
    # 存放认证用户名、密码文件(确认有对应权限)
    auth_basic_user_file    /data/www/webdav/.credentials.list;
    root /data/www/webdav/;

    # dav allowed method
    dav_methods     PUT DELETE MKCOL COPY MOVE;
    # Allow current scope perform specified DAV method
    dav_ext_methods PROPFIND OPTIONS;

    # In this folder, newly created folder or file is to have specified permission. If none is given, default is user:rw. If all or group permission is specified, user could be skipped
    dav_access      user:rw group:rw all:r;

    # MAX size of uploaded file, 0 mean unlimited
    client_max_body_size    0;

    # Allow autocreate folder here if necessary
    create_full_put_path    on;
}

创建用户

用户名

echo -n '$yourname:' | tee -a /data/www/webdav/.credentials.list

设置密码

openssl passwd -apr1 | tee -a /data/www/webdav/.credentials.list

重新加载nginx

# 检验配置文件
nginx -t

# 重启nginx
nginx -s reload

参考文章

Debian Ubuntu下Redis源码安装

安装依赖

# 更新
apt-get update
# 安装依赖工具
apt-get install -y build-essential tcl pkg-config

安装Redis

工作目录未/tmp

cd /tmp
# 下载
wget https://download.redis.io/releases/redis-6.2.1.tar.gz
# 解压
tar zxf redis-6.2.1.tar.gz
# 进入源码文件目录
cd redis-6.2.1/
# 编译源码
make
# 测试
make test
# 测试通过后,进行安装redis
make install

make test 完成

image-20210326090559219

配置Redis

设置配置文件redis.conf

- 阅读剩余部分 -

Debian安装Certbot获取SSL证书

安装snapd

# 安装snapd
apt-get update
apt-get install snapd

# 安装 snapd core
snap install core
snap refresh core

通过snapd安装certbot

snap install --classic certbot

# 软链接
ln -s /snap/bin/certbot /usr/bin/certbot

如果遇到无法下载,可能需要翻墙,请给snap设置代理:

sudo snap set system proxy.http=http://127.0.0.1:1081
sudo snap set system proxy.https=http://127.0.0.1:1081

获取SSL证书

执行certbot certonly

certbot certonly -d "*.youdomain.com" --manual --preferred-challenges dns-01  --server https://acme-v02.api.letsencrypt.org/directory
root@docker00:/usr/bin# certbot certonly -d "*.youdomain.com" --manual --preferred-challenges dns-01  --server https://acme-v02.api.letsencrypt.org/directory
Saving debug log to /var/log/letsencrypt/letsencrypt.log
Plugins selected: Authenticator manual, Installer None
Enter email address (used for urgent renewal and security notices)
 (Enter 'c' to cancel): xxx@xxx.com

- - - - - - - - - - - - - - - - - - - - - - - - - - - - - - - - - - - - - - - -
Please read the Terms of Service at
https://letsencrypt.org/documents/LE-SA-v1.2-November-15-2017.pdf. You must
agree in order to register with the ACME server. Do you agree?
- - - - - - - - - - - - - - - - - - - - - - - - - - - - - - - - - - - - - - - -
(Y)es/(N)o: Y

- - - - - - - - - - - - - - - - - - - - - - - - - - - - - - - - - - - - - - - -
Would you be willing, once your first certificate is successfully issued, to
share your email address with the Electronic Frontier Foundation, a founding
partner of the Let's Encrypt project and the non-profit organization that
develops Certbot? We'd like to send you email about our work encrypting the web,
EFF news, campaigns, and ways to support digital freedom.
- - - - - - - - - - - - - - - - - - - - - - - - - - - - - - - - - - - - - - - -
(Y)es/(N)o: N
Account registered.
Requesting a certificate for *.youdomain.com
Performing the following challenges:
dns-01 challenge for youdomain.com

- - - - - - - - - - - - - - - - - - - - - - - - - - - - - - - - - - - - - - - -
Please deploy a DNS TXT record under the name
_acme-challenge.youdomain.com with the following value:

<your_dns_txt_value>

Before continuing, verify the record is deployed.
- - - - - - - - - - - - - - - - - - - - - - - - - - - - - - - - - - - - - - - -
Press Enter to Continue
Waiting for verification...
Cleaning up challenges

IMPORTANT NOTES:
 - Congratulations! Your certificate and chain have been saved at:
   /etc/letsencrypt/live/youdomain.com/fullchain.pem
   Your key file has been saved at:
   /etc/letsencrypt/live/youdomain.com/privkey.pem
   Your certificate will expire on 2021-07-01. To obtain a new or
   tweaked version of this certificate in the future, simply run
   certbot again. To non-interactively renew *all* of your
   certificates, run "certbot renew"
 - If you like Certbot, please consider supporting our work by:

   Donating to ISRG / Let's Encrypt:   https://letsencrypt.org/donate
   Donating to EFF:                    https://eff.org/donate-le

- 阅读剩余部分 -

Debian jessie升级至buster

注意:不要跨版本升级,需要逐版本升级。

备份数据

升级前请做好备份操作,防止升级后相关服务不可用或数据无法正常读取。

  1. 程序代码
  2. 数据库文件
  3. 配置文件,如:Nginx、MySQL、PHP等
  4. 系统添加的用户和SSH Key等。
说明,下面操作建议使用root账号。

更新当前系统

apt-get update
apt-get upgrade
apt-get dist-upgrade

# 更新好后,建议重启下
reboot

升级至stretch

替换软件源

# 备份软件源
cp /etc/apt/sources.list /etc/apt/sources.list_bak

# 替换jessie为stretch
sed -i 's/jessie/stretch/g' /etc/apt/sources.list

- 阅读剩余部分 -

Linux下压缩、解压war文件包。
首先系统中必须安装有JDK,如果没有请安装:

apt-get install default-jdk

jar 命令说明

jar {ctxu}[vfm0M] [jar-文件] [manifest-文件] [-C 目录] 文件名 ...

其中{ctxu}是jar命令的子命令,每次jar命令中只能包含c、t、x、u中的一个,不可同时存在,因为不能同时压缩与解压缩。

  • -c:创建新的 JAR 文件包
  • -t:列出 JAR 文件包的内容列表
  • -x:展开 JAR 文件包的指定文件或者所有文件
  • -u:更新已存在的 JAR 文件包 (添加文件到 JAR 文件包中)
  • -f:定 JAR 文件名,通常这个参数是必须的。注意:在 f 之后要立即接档名,不要再加参数!
  • -m:指定需要包含的 MANIFEST 清单文件
  • -0:只存储,不压缩,这样产生的 JAR 文件包会比不用该参数产生的体积大,但速度更快
  • -M:不产生所有项的清单(MANIFEST〕文件,此参数会忽略 -m 参数
  • [jar-文件] :需要生成、查看、更新或者解开的 JAR 文件包,它是 -f 参数的附属参数
  • [-C 目录] :表示转到指定目录下去执行这个 jar 命令的操作。它相当于先使用 cd 命令转该目录下再执行不带 -C 参数的 jar 命令,它只能在创建和更新 JAR 文件包的时候可用
  • 文件名 ... :指定一个文件/目录列表,这些文件/目录就是要添加到 JAR 文件包中的文件/目录。如果指定了目录,那么 jar 命令打包的时候会自动把该目录中的所有文件和子目录打入包中。

实战:添加压缩包操作

jar -cvfM0 your_war.war ./

# 参数说明
# -c: 表示创建war包
# -v: 显示过程信息
# -f: 指定 JAR 文件名,通常这个参数是必须的
# -M: 不产生所有项的清单(MANIFEST〕文件,此参数会忽略 -m 参数
# -0: 这个是阿拉伯数字,只打包不压缩的意思

实战:解压war操作

jar -xvf your_war.war

Docker介绍

Docker是一个开源的应用容器引擎,基于 Go 语言 并遵从 Apache2.0 协议开源。
Docker 可以让开发者打包他们的应用以及依赖包到一个轻量级、可移植的容器中,然后发布到任何流行的 Linux 机器上,也可以实现虚拟化。
容器是完全使用沙箱机制,相互之间不会有任何接口(类似 iPhone 的 app),更重要的是容器性能开销极低。

文档地址:https://docs.docker.com/

仓库地址:https://hub.docker.com/

Docker入门

基本概念

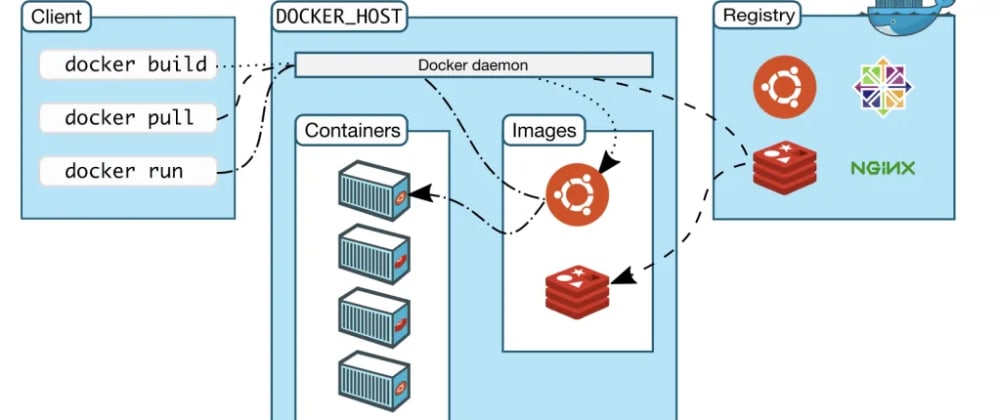
Docker基本组成:

Cover image for Getting Started with Docker for Developers

镜像 image

docker 镜像好比一个模板,可以通过这个目标创建容器服务。比如:nginx镜像 ===》run命令 ===》nginx01容器(提供服务)

容器 container

docker利用容器技术,独立运行一个或一组应用。容器是通过镜像创建的。

容器基本命令有:启动、停止、删除

仓库 repository

仓库是用来存放镜像的地方。

仓库可以分为:共有仓库、私有仓库。

Docker安装

Debian系统安装:

官方文档:https://docs.docker.com/engine/install/

# 卸载旧版本
apt-get remove docker docker-engine docker.io containerd runc

# 安装相关依赖和工具
apt-get install -y apt-transport-https ca-certificates curl gnupg lsb-release software-properties-common

# ######我们用阿里云替换官方###########
# 添加阿里云GPG key  https://mirrors.aliyun.com/docker-ce/linux/debian/
curl -fsSL http://mirrors.aliyun.com/docker-ce/linux/debian/gpg | apt-key add -
# 写入软件源信息
add-apt-repository "deb [arch=amd64] http://mirrors.aliyun.com/docker-ce/linux/debian $(lsb_release -cs) stable"

# ####默认使用官方源下载,####
# 添加Docker官方GPG key
curl -fsSL https://download.docker.com/linux/debian/gpg | gpg --dearmor -o /usr/share/keyrings/docker-archive-keyring.gpg
# 写入软件源信息
echo \
  "deb [arch=amd64 signed-by=/usr/share/keyrings/docker-archive-keyring.gpg] https://download.docker.com/linux/debian \
  $(lsb_release -cs) stable" | tee /etc/apt/sources.list.d/docker.list > /dev/null

# 安装Docker
apt-get update
apt-get install -y docker-ce docker-ce-cli containerd.io

# 配置镜像加速 可以在阿里云中的容器镜像服务下的镜像加速器替换"https://xxxxx.mirror.aliyuncs.com"
mkdir -p /etc/docker
tee /etc/docker/daemon.json <<-'EOF'
{
  "registry-mirrors": ["https://xxxxx.mirror.aliyuncs.com"]
}
EOF

# 重启docker
systemctl daemon-reload
systemctl restart docker

- 阅读剩余部分 -

Docker介绍

Docker是一个应用程序,它简化了在容器中管理应用程序进程的过程。容器允许您在资源隔离的进程中运行应用程序。它们与虚拟机类似,但是容器更可移植、更友好、更依赖于主机操作系统。

Docker安装的要求

系统要求

安装Docker支持如下系统:

  • Debian/Ubuntu Buster 10(stable)
  • Debian/Ubuntu Stretch 9 / Raspbian Stretch

卸载旧的版本(可选)

如果已安装有旧的版本,需要先卸载。卸载命令为:

sudo apt-get remove docker docker-engine docker.io containerd runc

Docker安装

Debian官方中的安装包中的Docker版本不一定是最新的,为了确保我们从Docker官方安装最新的Docker,我们需要添加一个新的包源,从Docker添加GPG密钥以确保下载是有效的,然后安装包。
注:如果是通过root登录的,下面的命令都可以省掉sudo

1. 更新Debian源和安装依赖

sudo apt-get update
sudo apt-get install apt-transport-https ca-certificates curl gnupg-agent software-properties-common

2. 添加GPG Key

curl -fsSL https://download.docker.com/linux/debian/gpg | sudo apt-key add -

3. 将Docker库添加至APT源,注意系统的平台,根据不同平台执行不同的命令

## x86_64 / amd64 平台
sudo add-apt-repository "deb [arch=amd64] https://download.docker.com/linux/debian $(lsb_release -cs) stable"

# armhf 平台
sudo add-apt-repository "deb [arch=armhf] https://download.docker.com/linux/debian $(lsb_release -cs) stable"

# arm64 平台
sudo add-apt-repository "deb [arch=arm64] https://download.docker.com/linux/debian $(lsb_release -cs) stable"

- 阅读剩余部分 -

一、系统安装

1、重新生成SSH host key

参考How To: Ubuntu / Debian Linux Regenerate OpenSSH Host Keys

# 删除原来的host keys
/bin/rm -v /etc/ssh/ssh_host_*
# 重新生成keys
dpkg-reconfigure openssh-server
# 重启ssh
/etc/init.d/ssh restart

在需要访问服务器端客户端上更新ssh指纹:

ssh-keygen -R <your_server_host>

2、更新包管理器及更新软件apt-get updateapt-get upgrade

设置apt源

比如我这里测试中国科技大学综合效果最好,更改sources.list中配置的源:

vim /etc/apt/sources.list
deb http://mirrors.ustc.edu.cn/debian/ stretch main
deb-src http://mirrors.ustc.edu.cn/debian/ stretch main

deb http://mirrors.ustc.edu.cn/debian-security stretch/updates main contrib non-free
deb-src http://mirrors.ustc.edu.cn/debian-security stretch/updates main contrib non-free

deb http://mirrors.ustc.edu.cn/debian/ stretch-updates main contrib non-free
deb-src http://mirrors.ustc.edu.cn/debian/ stretch-updates main contrib non-free

更新源中包数据库

  1. apt-get update出现:TypeError: 'NoneType' object is not callable

apt-get.jpg
解决:(参考Python 3.5 issues during apt-get update/upgradeopenmediavault omv3升级omv4)
打开文件:/usr/lib/python3.5/weakref.py,
109行由def remove(wr, selfref=ref(self)):改为:

def remove(wr, selfref=ref(self), _atomic_removal=_remove_dead_weakref):

117行由_remove_dead_weakref(d, wr.key)改为:

_atomic_removal(d, wr.key)
  1. apt-get update出现:Certificate verification failed: The certificate is NOT trusted. The certificate chain uses not yet valid certificate. Could not handshake: Error in the certificate verification.

出现这个问题可能是服务器本地时间不正常,导致证书验证错误,此时可以看下服务器时间:

root@aml:~# date
# 当前操作时间是:2021-03-22 09:58
Tue 26 Nov 2019 08:47:23 AM UTC

# 重新修改服务器时间
# 设置时区
timedatectl set-timezone "Asia/Shanghai"
# 设置时间
date -s "2021-03-22 09:58:00"

完成后,就可以正常执行:

apt-get update
apt-get upgrade

3、安装常用软件

  • 安装apt-get的扩展软件aptitude

    apt-get update aptitude
  • 用于替换nanovi的编辑vim

    aptitude install vim

4、设置区域、时区并同步时间

# 设置区域
dpkg-reconfigure locales
# 设置时区
dpkg-reconfigure tzdata

如果可以的话,与ntp服务器同步下时间:

apt-get install ntpdate
ntpdate ntp1.aliyun.com

5、设置bash环境变量

vim ~/.bashrc

设置内容,然后使设置生效source /root/.bashrc

6、设置vim环境变量

  • 创建vim环境变量文件touch ~/.vimrc
  • 设置环境变量内容:

    syntax on
    set fencs=utf-8,gbk
    set shiftwidth=4
    set softtabstop=4
    set tabstop=4
    set number

7、添加用户

# 添加用户
useradd -d /home/{username} -m -s /bin/bash -U {username}
# 设置新加用户密码
passwd {username}

这样用户就添加成功了,但是可能由于ssh的配置文件sshd_config限制了指定组才能通过ssh登录,比如:AllowGroups root ssh,限定只有用户属于组rootssh的用户才能登录。将我们新加的用户添加都允许登录的组:

usermod -a -G ssh {username}

8、设置ssh配置信息

ssh默认端口22,安全起见强烈建议更改为其他端口号并限制root账号直接通过ssh登录。

vim /etc/ssh/sshd_config
# 更改端口
Port xxxxx
# 禁用root账号直接登录
PermitRootLogin no
# 仅允许root和ssh组使用
AllowGroups root ssh
# 重启ssh服务
/etc/init.d/ssh restart

9、添加swap交换文件(可选)

  • 添加swap文件:(设置512M:1024 512MB = 524288;设置1G:1024 1024 = 1048576;设置2G:1024 1024 2 = 2097152)

    dd if=/dev/zero of=/swapfile bs=1024 count=1048576
  • 设置swap文件用户即权限

    chown root:root swapfile
    chmod 777 swapfile
  • 将文件转为交换文件并激活

    mkswap /swapfile
    swapon /swapfile
  • 自动挂载交换分区文件

    vim /etc/fstab
    # 新起一行添加
    /swapfile swap swap defaults 0 0
  • swap交换文件优先等级

    # 查看你的系统里面的swappiness (默认是:60)
    cat /proc/sys/vm/swappiness
    
    # 临时修改swappiness值
    sysctl vm.swappiness=90
    
    # 永久更改swappiness(如果配置文件没有,可以在配置文件最后追加)
    vim /etc/sysctl.conf
    vm.swappiness = 90
    
    # 使设置生效
    sysctl -p

10.安装omv-extras

参考:omv-extras Guides
支持deb安装和命令行安装,这里用命令行:

wget -O - http://omv-extras.org/install | bash

二、安装软件

1、安装MySQL 5.6

参考:MySQL :: A Quick Guide to Using the MySQL APT RepositoryHow To Install MySQL on Debian 9 (Stretch)

  • 添加MySQLAPT 仓库

    cd /tmp
    wget https://repo.mysql.com//mysql-apt-config_0.8.13-1_all.deb
    dpkg -i mysql-apt-config_0.8.13-1_all.deb
  • 安装MySQL

    apt-get update
    aptitude install mysql-server
  • MySQL Secure Installation

    # 重启MySQL服务
    systemctl restart mysql
    
    # 调用
    mysql_secure_installation

阿里云ECS服务器默认都会安装阿里云盾的agent,对于轻量服务器,比如内存只有512M的,我们可以卸载阿里云盾来释放此部分占用的内存。
注意:除了安装云盾的agent外,还会安装云监控的agent。
下面的命令都要用root账号或者sudo来运行

卸载阿里云插件

首先运行如下命令检测是否安装了阿里云插件:

ps aux | grep aliyun-service

如果返回的grep命令本身以外的进程,则表示服务器安装了阿里云插件。
下载卸载aliyun-service的脚本:aliyunservice_uninstall.zip
运行下面的命令:

-- 下载脚本
-- wget http://update.aegis.aliyun.com/download/uninstall.sh
wget https://www.jyoryo.com/usr/uploads/2019/06/4036770658.zip
unzip 536308210.zip
chmod +x aliyunservice_uninstall.sh aliyunservice_quartz_uninstall.sh
./aliyunservice_uninstall.sh
./aliyunservice_quartz_uninstall.sh

清除云插件进程和文件:

pkill aliyun-service
rm -fr /etc/init.d/agentwatch /usr/sbin/aliyun-service
rm -rf /usr/local/aegis*

现在再运行ps aux | grep aliyun-service应该就只会返回grep本身这条结果了。

卸载云监控的插件

首先运行如下命令检测是否安装了云监控的插件:

ps aux | grep cloudmonitor

如果返回超过一条命令,则证明安装了云监控插件。请执行如下命令来卸载删除:

bash -c "/usr/local/cloudmonitor/wrapper/bin/cloudmonitor.sh remove
rm -rf /usr/local/cloudmonitor

frp 是一个可用于内网穿透的高性能的反向代理应用,支持 tcp, udp 协议,为 http 和 https 应用协议提供了额外的能力。类似的还有:ngrok、lanproxy等(frp和ngrok都是用go实现,lanproxy是用java实现)。利用内网穿透,我们可以实现微信调试,将内网的应用对外展示等。
搭建分服务器端和客户端。

服务器端搭建

下载软件

下载软件:FRP Releases
支持多平台,需根据服务器系统和CPU架构选择下载。下载的包是同时包含服务器端和客户端软件的。下载速度可能会比较慢,请耐心等会。

## 存放下载文件目录
cd /data/source
## 下载
wget https://github.com/fatedier/frp/releases/download/v0.27.0/frp_0.27.0_linux_386.tar.gz
## 解压
tar zxf frp_0.27.0_linux_386.tar.gz
## 移至安装目录
mv frp_0.27.0_linux_386 /data/soft/frp

- 阅读剩余部分 -